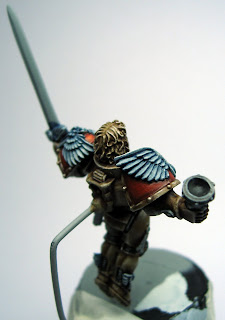
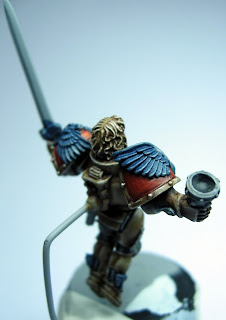
And yes, as you might have guessed it, the wings and feathers etc are finally finished. That final highlight and touching up was much more time consuming than I expected but at least I can say I like the end result.
Recipe for the wings:
- Basecoat with a 1:1 mix of Adeptus Battlegrey : Astronomican Grey
- Wash with Asurmen Blue
- Highlight with Codex Grey
- Highlight with Fortress Grey
- Highlight with a 1:1 mix of Fortress Grey : Skull White
- Highlight with Skull White
- Paint recesses with a 1:1 watered down mix of Chaos Black : Necron Abyss
- Touch up highlights with Skull White
I found out that for the jump pack wings it's better to use a larger brush (size 2 or GW standard brush) for all highlighting except the final Skull White highlight and even at that stage I recomend the use of a smaller brush for the extreme edges only. Using a larger brush will not only make highlighting easier but it will help you manipulate paint towards the edges of the feathers.Furtheromore it will help build up some texture on your highlights to emitate the texture of the feathers in the wings. For the rest of the feathery bits you can highlight normally as the individual feathers are too small to use a large brush.
Σάββατο 28 Αυγούστου 2010
Τρίτη 24 Αυγούστου 2010
Sanguinor - wings almost finished
After a small absence due to a bit of vacation and a lot of mountain biking I managed to do some work on Sanguinor. At this stage the wings and feathery stuff are almost finished though I'd have to add the final pure white highlight and do a bit of touch up. I'm really happy with how the blueish shading worked out. I hope you like it as well.
Σάββατο 14 Αυγούστου 2010
My work area
Inspired by this post in Bolter & Chainsword I thought I should post a picture of my work area here so you can see... where the magic happens! I even labelled the most important bits for you. OCD you say? But why...?
Sanguinor - red parts finished & feathery bits shaded.
I didn't manage to do a lot of work on the mini today. I did however finish the red shoulderpads and I must say I'm quite please with how they turned out and how they tie with the rest of the mini. I also shaded the feathery bits. I think they turned out ok and it will give a nice white with blueish shadows when highlighted with greys and white. I went for blue shading so it contrasts with the warm colours of the mini. In generaly I'm happy with the progress so far. It's moving slowly but I'm enjoying it and learning new techniques.
Πέμπτη 12 Αυγούστου 2010
Sanguinor - silvery mettalics painted and paint recipe added
I think it's comming together nicely. Next in line are the wings and all... "feathery" bits.
Here's the recipe for the silver NMM:
- Basecoat with a 1:1 mix of Adeptus Battlegrey : Astronomicon Grey (depending on how dark you want you want your mettalics you can add more or less of each colour and even use straight Adeptus Battlegrey or Astronomicon Grey)
- 3 washes of Badad Black
- Highlight with Codex Grey
- Highlight with Fortress Grey
- Highlight with Skull White
Τετάρτη 11 Αυγούστου 2010
Sanguinor - armour finished and I added a recipe for painting the blue glow in the jump pack
I'm very happy to announce that the armour is now more or less finished! I must say I'm quite fond of the result. Since it was my first attempt at NMM I was afraid it would go horribly wrong but I think it turned out prety well - for a "good tabletop quality" mini anyway. I even painted the glow on jump pack's exhaust! I'm quite curious to hear what you think of the mini so far.
And since I've been asked about it on Bolter & Chainsword I'll add the recipe for the blue glow in the jump pack thrusters here.
Actually painting the glow is pretty easy:
- Basecoat with Astronomican Grey
- Wash with Asurmen Blue
- Highlight with Astronomican Grey (I think that Fortress Grey would work as well if not better due to less pigmentation)
- Highlight with Skull White
- Glaze with a mix of 1:2 Asurmen Blue:H2O
- Highlight with Skull White
It may sound like a lot of stages but since you can be quite relaxed as far as highlight placement and "crispness" is concerned it can be done pretty quickly. It's good to have a hair dryer nearby to help the washes dry or, if you have lots of jump packs to paint, you can batch-paint the glow to save time.
Δευτέρα 9 Αυγούστου 2010
Sanguinor WIP - my first NMM attempt
After years of working only with "true" metallics I finally bit the bullet and went to try a bit of NMM. It's not that I was against NMM all this time but when you've spent so much time trying to perfect your technique for metallics it's kind of intimidating to start again trying to learn a new technique. However I have found something that will make this first attempt just a bit easier. A guy over at Bolter & Chainsword painted a fantastic NMM Sanguinary Guard army using the new washes. It's quite an easy way to paint NMM and the results are more than good. I know you'll probably want to see that army at this point and I also have to give some credit for the inspiration so here are the links for the WIP thread and the finished army.
And here are some WIP pics of my mini. At the moment it has only received two successive Gryphone Sepia washes over the grey primmer. I'll try to add some highlights as soon as I can and then I'd have an idea of how the mini will look.
And here are some WIP pics of my mini. At the moment it has only received two successive Gryphone Sepia washes over the grey primmer. I'll try to add some highlights as soon as I can and then I'd have an idea of how the mini will look.
Εγγραφή σε:
Σχόλια (Atom)


