Εμφάνιση αναρτήσεων με ετικέτα Tutorial. Εμφάνιση όλων των αναρτήσεων

Κυριακή 6 Φεβρουαρίου 2011

Imperial Missionary - final pics, CMON link and some tutorials

Nothing fancy here just my shot at CMON glory! I was asked the recipes for the plasma gun casing and the face on various forums so I'll add them here. The plasma gun colour may be familiar to you since it's the colour I've used on most weapons in my inquisitorial retinue. Let's move on to the recipes.

Weapon casing:
- Basecoat with Khemri Brown
- Wash with Devlan Mud
- Highlight with Graveyard Earth
- Highlight wth a 1:1 mix of Graveyard Earth & Comando Khaki
- Highlight with Comando Khaki

Chipping was done using the sponge from a blister pack but any kind of foam will do. The sponge was dipped in paint, then most paint was wiped off on a tissue and the sponge was dabbed on the gun. It's best to practice on a scrap mini first to get a feel of how it works. A mix of Chaos Black and Scorched Brown was sponged on followed by Boltgun Metal. The foam from a blister pack is ideal since it can be twisted to a point when you want to apply a chipped effect on a small area.

Face:
- Basecoat with Talarn Flesh
- Wash with Ogryn Flesh wash
- Highlight with Dwarf Flesh
- Highlight with a 1:1 mix of Dwarf Flesh & Elf Flesh
- Highlight with Elf Flesh
- Glaze lower lip with Baal Red
- Wash Scars and a little bit of the surrounding area with Baal Red
- Rehighlight scars with Elf Flesh

Obligatory CMON voting link!


Δευτέρα 24 Ιανουαρίου 2011

Inquisitor in terminator armour - finished & a tutorial

It's finally done! I'm pleased with the result but I'd like to hear your comments and any sugestions for last minute changes before varnishing. Since some people have asked me for the recipes for certain colours I'll also write a tutorial here.


Red:
This will need some explantaion since I used a somewhat combined technique. The basis was layering but with very thin paint and concentrating the highlights on the uppermost areas. Think of it as a mix of layering and directional highlitghting. I basecoated with a mix of Chaos Black and Scab Red, highlighted with Scab Red and then washed the mini with a mix of Deval Mud & Badab Black. For subsequent highlights I used all of GW's reds moving up to pure Blazing Orange for the final highlights. A thin glaze of Baal Red unified the colour before the final highlight. In general the use of a thin glaze before the final highlight is an easy and effective way to "tie"the colours together. Another important thing to remember here is when you're moving form darker to lighter colour it's better to use an intermediate highlight stage with a mix of the two colours. In these case the highlight sequence after the wash was:
- Scab Red
- Scab Red: Red Gore 1:1
- Red Gore
- Red Gore: Blood Red 1:1
- Blood Red
- Blood Red: Blazing Orange 1:1
- Thin Baal Red Glaze
- Blazing Orange
This may seem like an overkill but actually the armour was very easy to paint and it took me only about 2 hours.

Hood:
This also needs a bit of explanation. It was my first time trying this colour so there was a bit of experimentation. The idea was to use an ochre as a midtone to achieve a more "yellowy" cream colour. So here's how it goes:
- The hood was basecoated with Calthan Brown
- A second basecoat of Tausept Ochre was applied covering everything except deep recesses
- The hood was highlighted with a 1:1 mix of Tausept Ochre: Dheneb Stone
- A second highlight of Dheneb stone was applied
- The hood was washed with Gryphone Sepia
- A wash of Devlan Mud was applied directly in the recesses
- The hood was highlighted with Bleached Bone
- A second highlight with a 1:1 mix of Bleached Bone & Skull White was applied
- Pure Skull White was used for the final highlight

Gold:
- Basecoat with a 1:1:1 mix of Tin Bitz, Dwarf Bronze & Scorched Brown
- Apply a second basecoat of 1:1 Tin Bitz & Dwarf Bronze everywhere except in deep recesses
- Wash the recesses with a 1:1 mix of Deval Mud & Badab Black
- Highlight with a 1:1:1 mix of Tin Bitz, Dwarf Bronze & Mithril Silver
- Highlight extreme edges with a 1:1 mix of Shining Gold & Mithril Silver


Pics:


Κυριακή 16 Ιανουαρίου 2011

Inquisitorial Chimera - some insight, new pics, a CMON link and a mini book review (and a long title for a long post)

I told you I'll write more about the Chimera so here it is. It is my second attempt at airbrushing a vehicle and my first attempt at using oils and pigments for weathering. I took a great deal of advice from Forge World's Imperial Armour - Model Mastercalss book so before I start telling you about the Chimera I'll talk about this book. I'm a sucker for painting and modeling books so I have most of the "How to paint" books that Gw has produced and some scale modeling books. Unfortunately GW's books are too "corporate" in the sense that they're more focused on showcasing their products. You get a bit of info on basic techniques and the rest of the book is pictures of GW minis, tools, paints etc. The scale modeling books on the other hand offer a better explanation of the techniques but sometimes they are too complicated and their techniques are not always aplicable to sci-fi minis. Another problem is that they use paints that most wargammers are not familiar with. The Model Masterclass book bridges the gap between thes etwo types of books. It is suprisingly "non-corporate" for a Gw product and most of the tools and paints it uses are used by most hobyists. If you have an airbrush you only need to buy a couple of oil colours and pigments to be able to aply the full range of techniques it showcases. In my opinion it's worth its weight in... limited edition metal miniatures.

Now on to the mini itself. One of the more important things when you are painting a large mini and using lots of different techniques is to have a clear plan of what you're going to do and in what order you're going to do it. Usually the order is: Airbrushing - oil washes - rust - detail painting - mud and dust - oil stains etc. Just make sure that  each step compliments the next and it doesn't force you to redo or repaint anything. Again I took a lot of advice from the FW book. Working with oils and pigments is relatively easy once you get over the fear of using "advanced techniques". Make sure that the thinner in the oils has evaporated before you start manipulating them or before you move to the next stage and you'll be ok. I forgot it a couple of times but thankfully I avoided any major mishaps.

Now I'll give you a run-down of the techniques I used and some info about them. I'm sure I won't be able to cover everythiing so feel free to ask questions.

- First the basic colours were airbrushed. Some basic highlighting and shading was airbrushed on as well.

- Then I tackled the front of the dozzer blade. Various metallic colours were airburhsed on and then it received a few layers of hairspray. After the hairspray had dried I sprayed a patchy coat of Dessert Yellow. Then a large drybrush was dampened in warm water and rubbed on the surface of the dozzer blade. The water caused the hairspray to losen thus exposing the metallic colours underneath.

- Washes of oil paint waere applied next. First the mini received a coat of acrylic gloss varnish. This helped the wahses flow and also protected the paint. A dark brown oil paint was thinned with odourless white spirits and applied to any recessed lines and around rivets. A hair dryer was used to help the thinner evaporate and then the oils were blened to the surfaces using a large flat brush. The brush motion was vertical to the minis surfaces.

- After the oils had dried completely rust was added to the mini. Rust coloures oils and pigments were mixed with odourless white spirit and flicked onto the model using a brush. You can user use a stick to tap the brush or you can justflick your finger on the brushes bristles to make the paint flick randomly on the model. The rust stains were left to dry and then clean white spirit was airbrushed on them. This caused some to difuse, others to disolve completely while others were left unaffected thus greating various levels or rusting. A word of warning here: It may be better to apply anothe layer of acrylic gloss varnish after the oil washes have dried as airbrushing white spirit onto the rust stains may also disolve some of the oil wash.

- At this point the mini received a layer of matte acrylic varnish and all the details except lenses were painted.

- Then it was weathering time. Various earth coloured powders were brushed onto the tracks (these had been airbrushed Scorched brown) and onto the lower portion of the vehicle. I used lots of powder sometime in clumps as to give to the impression of collected dirt. The powders were fixed in place with a very diluted wash of Graveyard earth. After the wash had dried with the help of a hair dryer the pigments were blended with a large flat brush. The tracks were drybrusehd with a Chaos Black & Boltgun Metal mix.

- The next step of weathering involved dissolving some earth coloured weathering powders in the Graveyard Earyth wash till there was a thick mixture. This mixture was flicked onto the model to create dried mud splatters & spots. After they had dried some of the spots were blended using dry & slightly dampened flat Brushes.

- The lenses were painted next. Small ones were painted by hand using the same tecnique as that for painting gems. The large one was painted by airbrushing various shades of blue which got progressively lighter as I moved to the lower part of the lens. The last highlight was Skull White. The adjacent areas had been masked prior to spraying the lens.

- The mini received one layer of gloss and two layers of matte acrylic varnish. The varnish sealed the mini and toned down some of the pigments. A hairdryer was used to make sure that the varnish dried quickly and uniformly.

- Finally undiluted brown ink was airbrushed on and around exhaust ports and pistons to simulate oil build up and the lenses were hand varnished with gloss varnish.

- The last step was wirtting a really long blog post!


Some random bits of advice:

- Use a hirdryes to help pretty much everything dry.

- Make sure someting has dried before moving to the next stage.

- Be carefull when using pigments. They're very easy to spill and very hard to clean.

- Always plan and think one step ahead.


And because this post has to end at some point....  CoolMiniOrNot voting link and some new and hopefully better pics:


Παρασκευή 7 Ιανουαρίου 2011

Dark Eldar Archon - finished & recipe for the gold.

So here he is in all his xenos glory! I'm not so pleased with how the huskblade turned out but I don't know if I'll bother repainting it. Let me know what you think...


After popular request here's the recipe for the gold, mostly "borrowed" from Eavy Metal's Dark Eldar masterclass in UK WD 371:

- Basecoat with a 1:1:1 mix of Tin Bitz, Dwarf Bronze & Scorched Brown
- Apply a second basecoat of 1:1 Tin Bitz & Dwarf Bronze everywhere except in deep recesses
- Wash the recesses with a 1:1 mix of Deval Mud & Badab Black
- Highlight with a 1:1:1 mix of Tin Bitz, Dwarf Bronze & Mithril Silver
- Highlight extreme edges with Mithril Silver (or with a 1:1 mix of Shining Gold & Mithril Silver for not so harsh highlights)


Τετάρτη 13 Οκτωβρίου 2010

Gun servitor - mega tutorial with airbrushing and weathering tips!

You asked for a tutorial for the weathered mettalics but I though a full, all bells and whistles, mega tutorial would be better! I tried to cover each and every part of the mini and also went into some detail on airbrushing and weathering techniques. I hope you'll enjoy it!
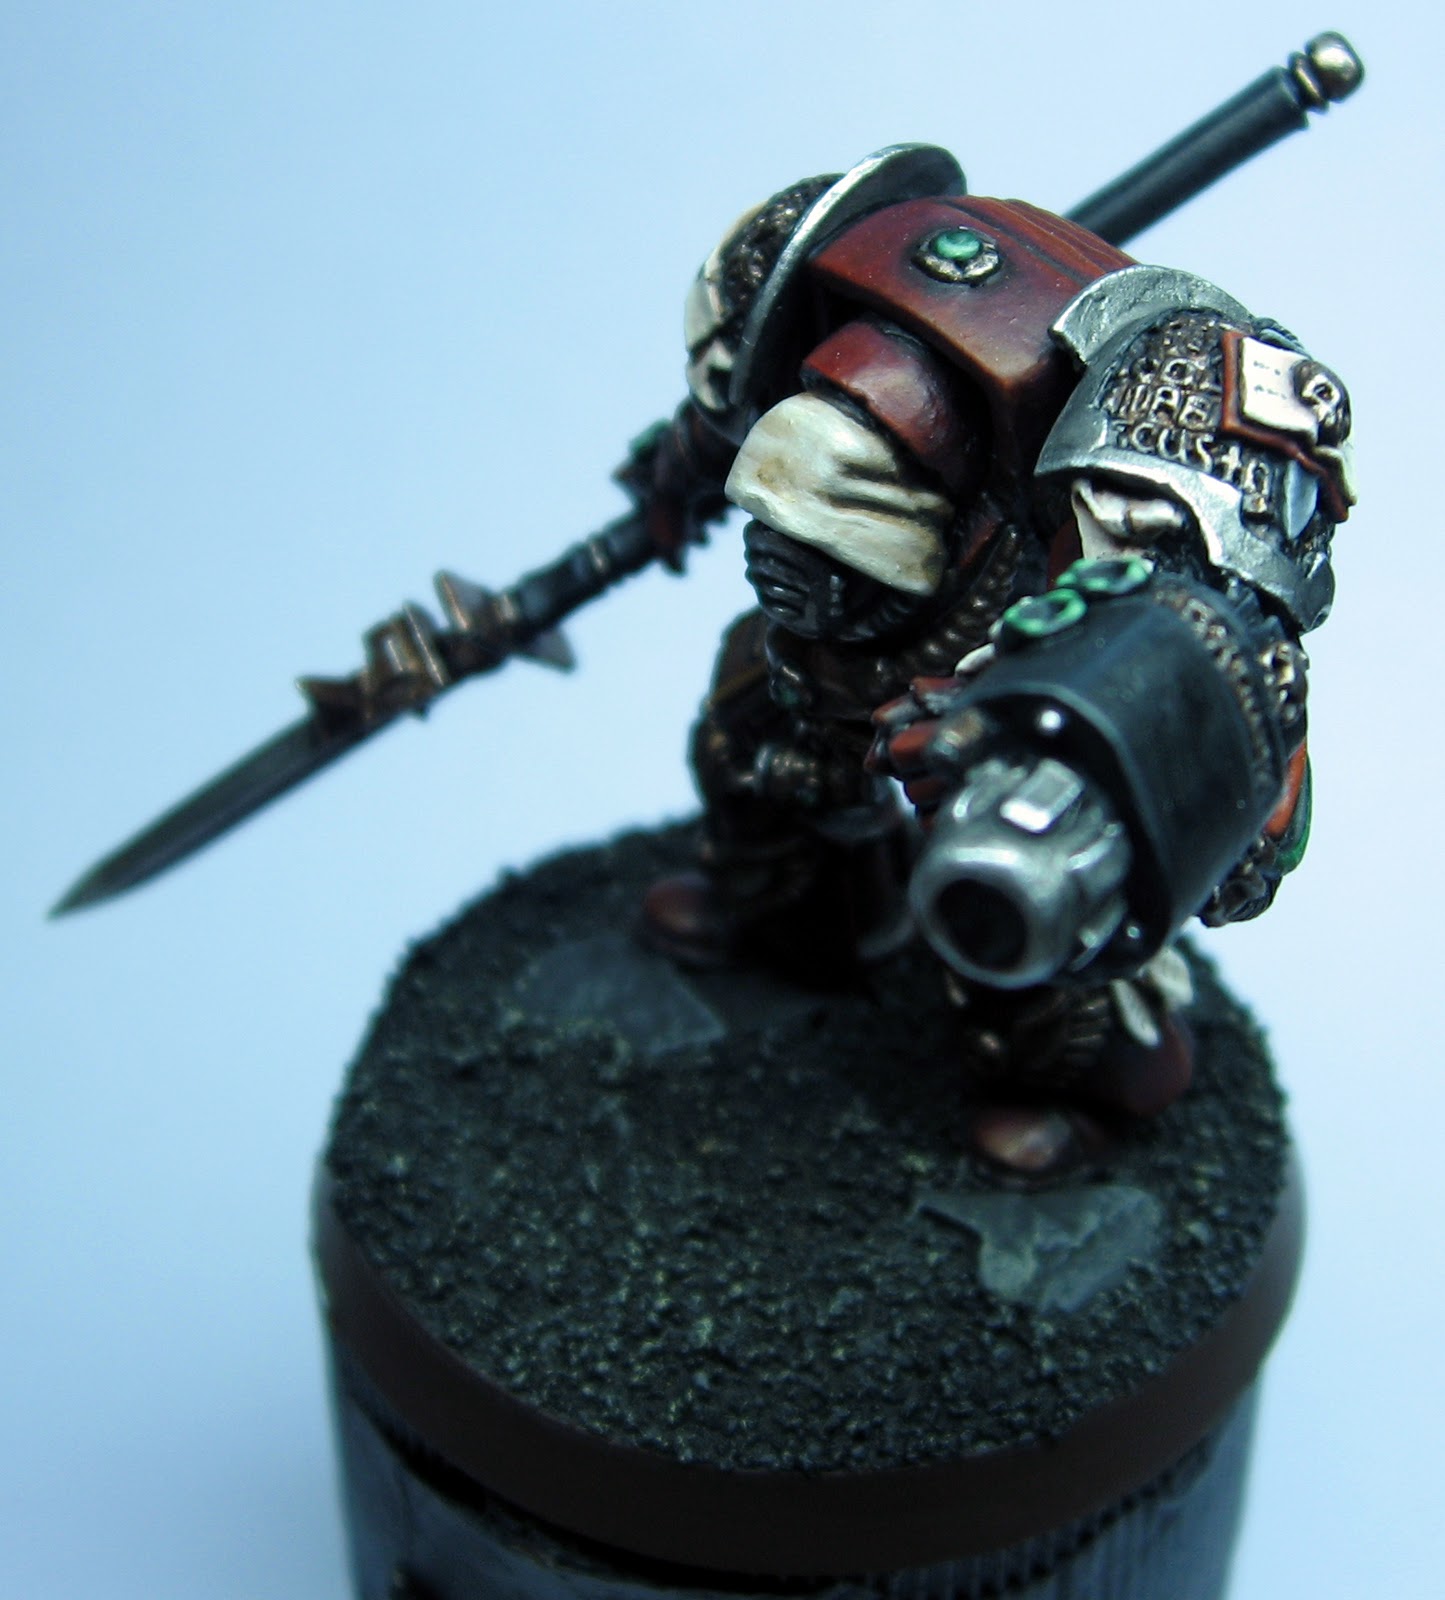


Weathered steel


For this I used the 'Eavy Metal tutorial from UK WD  369 which I've adapted slightly. One thing to keep in mind is that the first washes should be aplied more liberally while the darker washes should be focused on the recesses and shaded areas.
- Basecoat with Boltgun Metal
- Shade recesses and joints with Chaos Black
- Wash with Gryohone Sepia
- Wash with Ogryn Flesh and give the recesses some extra treatment
- The recesses are washed with Devlan Mud
- Patches of Thraka Green are aplied with special attention given to the recesses
- Highlight with Chainmail
- Highlight with Mithril Silver

Clean steel
- Basecoat with Boltgun Metal
- Highlight with Chainmail
- Wash with a 2:2:1 mix of Devlan Mud: Badab Black: Leviathan Purple
- Highlight with Chainmail
- Highlight with Mithril Silver

Gold
- Basecoat with Tin Bitz
- Paint everything except deep recesses with Dwarf Bronze
- Highlight with Shining Gold
- Wash with a 2:2:1 mix of Devlan Mud: Ogryn Flesh: Leviathan Purple
- Highlight with Shining Gold
- Highlight with a 1:1 mix of Shining Gold & Mithril Silver

Skull


- Basecoat with Calthan Brown
- Paint everything except deep recesses with Dheneb Stone
- Wash with Devlan Mud
- Highlight with Bleached Bone
- Highlight with Skull white

Plasma cannon casing


- Basecoat with Khemri Brown
- Wash with Devlan Mud
- Highlight with Graveyard Earth
- Highlight with a 1:1 mix of Graveyard Earth & Kommando Khaki
- Highlight with Kommando Khaki

Green Cables
- Basecoat with a 1:1 mix of Orkhide Shade & Chaos Black
- Highlight with Dark Angels Green
- Wash with Devlan Mud
- Highlight with Dark Angels Green
- Highlight with a 1:1 mix of Dark Angels Green & Snot Green
- Highlight with Snot Green
- Highlight with a 1:1 mix of Snot Green & Bleached Bone

Red Cables
- Basecoat with a 1:1 mix of Mechrite Red & Chaos Black
- Highlight with Red Gore
- Wash with Devlan Mud
- Highlight with Red Gore
- Highlight with a 1:1 mix of Red Gore & Blood Red
- Highlight with Blood Red
- Highlight with a 1:1 mix of  Blood Red & Dwarf Flesh

Tracks


- A basecoat of Chaos Black was applied
- The tracks were heavily drybrushed, first with Tin Bitz and then with Boltgun Metal
- The area where the tracks meet the body of the tank was washed liberally with Devlan Mud
- A wash of thinned Vermin Brown was applied liberally all over the tracks. I used a piece of kitchen paper to remove excess wash leaving the wash only in the recesses.
- A final light drybrush of Boltgun mettal was applied

Tank parts


The part of the mini that was essentialy a miniature tank was mostly painted using an airbrush and since not everybody is familiar with airbrushing I'll cover this part in greater detail.

First a basic paintjob was applied.
- A basecoat of Codex Grey was sprayed at a pressure of 10 -15 psi taking care to leave the recesses darker.
- Scorched brown was sprayed at a pressure of 5- 10 psi to shade the recesses.
- Pannels were highlight with a 1:1 mix of  Codex Grey & Fortress Grey (The pressure is set again to around 10 - 15 psi for this and the next stages of the basic paintjob).
- A final highlight of Fortress Grey was sprayed concentrating on the centre of pannels.
- Fortress grey was drybrushed in the mini to highlight the pannel edges.

Then I applied some battle damage.
- First Charadon Ganite was sponged on, concentrating on the edges of pannels and places were wear and tear will be greater. For this I used the foam tham comes with a blister pack, dipping it in paint and them whipping most of it a way. Sponging was then dome witha stabbing motion on the mini. It's best to test on a piece of scrap (or on the underside of a tank) first to get the feel of it.
- Then Boltgun Metal was sponged on at areas where the bare metal would be exposed.
- Using my finger I applied some graphite (which I had scraped off a pencil) to edges and areas where bare metal would be exposed to give an extra mettalic sheen.
- Watered down Vermin Brown and sometimes also Blazing Orange was applied around rivets to simulate rust. The intensity of the washes varied in order to portray different stages of rust. It's better to apply several thin washes instead of a thicker one.
 
Finally the mini was weathered.
- Graveyard Earth was sprayed at a pressure of 5- 10 psi at the lower part of the mini to simulate dust.
- A 1:1 mix of Chaos Black & Scorched Brown and then pure Chaos Black was sprayed at a pressure of 5- 10 psi to simulate soot around the two exhaust vents.

And since all this airbrush talk can drive a person crazy it's time to give you some airbrush tips.
- Window cleaning fluid makes a great thinner for airbrushing GW paints (though I haven't tried it yet with foundation paints or washes). Tamiya also produces a good thinner for acrylic paints but it's harder to get and more expensive than window cleaning fluid.
- It's always best to thin your paint a lot and go for multiple subtle layers of colour. It will also prevent nozzle clogging. I can't give you an exact thing ratio but for basecoating it is around 4:6 paint: thinner and for detail work such as weathering and shading it is around 2:8 paint: thinner. In general the lower the pressure you use the thinner your paint should be.

Σάββατο 2 Οκτωβρίου 2010

Sanguinor mega tutorial

I believe I've promised some time ago that I'm going to collect the mini tutorials for the various parts of this mini in a glorious mega tutorial sort of post so here it goes.


NMM Gold:
- Grey basecoat ( I had used a medium grey primmer on this mini so it served as the basecoat)
- 2 washes of Gryphone sepia
- Highlight with Bleached Bone
- Highlight with Skull White

NMM Silver:
- Basecoat with a 1:1 mix of Adeptus Battlegrey : Astronomicon Grey (depending on how dark you want you want your mettalics you can add more or less of each colour and even use straight Adeptus Battlegrey or Astronomicon Grey)
- 3 washes of Badad Black
- Highlight with Codex Grey
- Highlight with Fortress Grey
- Highlight with Skull White


Blue glow on jump pack thrusters:
- Basecoat with Astronomican Grey
- Wash with Asurmen Blue
- Highlight with Astronomican Grey (I think that Fortress Grey would work as well if not better due to less pigmentation)
- Highlight with Skull White
- Glaze with a mix of 1:2 Asurmen Blue:H2O
- Highlight with Skull White

Wings:
- Basecoat with a 1:1 mix of Adeptus Battlegrey : Astronomican Grey
- Wash with Asurmen Blue
- Highlight with Codex Grey
- Highlight with Fortress Grey
- Highlight with a 1:1 mix of Fortress Grey : Skull White
- Highlight with Skull White
- Paint recesses with a 1:1 watered down mix of  Chaos Black : Necron Abyss
- Touch up highlights with Skull White

Scrolls and purity seals:
- Calthan Brown (shade)
- Talarn Flesh (basecoat - painted everywhere except in deep recesses)
- Highlight with Bleached Bone

- Highlight with Skull White

Gems:
- Tausept Ochre basecoat
- Highlight with Sunburst Yellow

- 2 washes of Baal Red
- Highlight with Sunburst Yellow
- Highlight with Skull White
- Round gems also received white reflective dots

Blood vial:
I just followed the 'Eavy Mettal tutorial for Sanguinor from UK White Dwarf 364.

Sword Blade:
I just followed the 'Eavy Mettal tutorial for Sanguinor from UK White Dwarf 364. A word of caution though! If you're going to use that tutorial foi the sword blade keep in mind that you will end up with a different colour than that shown in the tutorial pictures. The paint mixtures are quite off and even though I lightened my base colour mix it still ended up darker than that shown in the pics. Also keep in mind that you might have to blend more than the tutorial suggests.

Τρίτη 21 Σεπτεμβρίου 2010

Miniature photography tutorial (sort of)


Taking inspiration from a request for a collaborative post for FTW Bloggers Group I decided to tackle the subject of miniature photography once more. Since there are already many good tutorials around I decided to write an article showcasing two of my favourite tutorials. I chose these tutorials because they are easy to follow even for people with limited knowledge of digital photography and furthermore they need no specialist equipment. They have enabled me to take decent pics with minimum fuss so I highly recommend them for beginners or people who just can’t be bothered spending hours to get a decent shot of their minis. The first tutorial focuses on photographing minis while the second focuses on photoshopping pics of minis.

Tutorial focused on photographing minis

Tutorial focused on photoshoping minis

And a few tips concerning Photoshop and image size…

1) "Auto Levels" in Photoshop does a pretty decent job if you can’t be bothered to adjust Levels manually.  You can try both methods and compare the end results. Usually when I have to edit lots of pics I just use "Auto Levels".

2) Reduce the image size. The standard in CMON and most forums is 600 pixels width.

3) In Photoshop there’s the “Save for Web" option which allows for a decent image quality combined with a small file size. When you choose this option select "High" as the quality setting and you’d have the best balance between image size and picture quality. Anything better than "High" will only increase the file size without any significant improvement in image quality.

And lastly some of the most useful Photoshop shortcuts (very useful when you have to edit 30+ pics):

Auto Levels = Shift+Ctrl+L
Image Size (adjust) = Alt+Ctrl+I
Save for Web = Alt+Shift+Ctrl+S

Σάββατο 28 Αυγούστου 2010

Sanguinor - got wings, will fly (with added tutorial for the wings)

And yes, as you might have guessed it, the wings and feathers etc are finally finished. That final highlight and touching up was much more time consuming than I expected but at least I can say I like the end result.

Recipe for the wings:
- Basecoat with a 1:1 mix of Adeptus Battlegrey : Astronomican Grey
- Wash with Asurmen Blue
- Highlight with Codex Grey
- Highlight with Fortress Grey
- Highlight with a 1:1 mix of Fortress Grey : Skull White
- Highlight with Skull White
- Paint recesses with a 1:1 watered down mix of  Chaos Black : Necron Abyss
- Touch up highlights with Skull White

I found out that for the jump pack wings it's better to use a larger brush (size 2 or GW standard brush) for all highlighting except the final Skull White highlight and even at that stage I recomend the use of a smaller brush for the extreme edges only. Using a larger brush will not only make highlighting easier but it will help you manipulate paint towards the edges of the feathers.Furtheromore it will help build up some texture on your highlights to emitate the texture of the feathers in the wings. For the rest of the feathery bits you can highlight normally as the individual feathers are too small to use a large brush.

Πέμπτη 12 Αυγούστου 2010

Sanguinor - silvery mettalics painted and paint recipe added

I think it's comming together nicely. Next in line are the wings and all... "feathery" bits.

Here's the recipe for the silver NMM:

- Basecoat with a 1:1 mix of Adeptus Battlegrey : Astronomicon Grey (depending on how dark you want you want your mettalics you can add more or less of each colour and even use straight Adeptus Battlegrey or Astronomicon Grey)
- 3 washes of Badad Black
- Highlight with Codex Grey
- Highlight with Fortress Grey
- Highlight with Skull White